
How to build big, strong, durable shoulders at home

Few things advertise strength and fitness like big, round shoulders, but as you may have noticed, it isn't easy to get results. Maybe you're a family man. Perhaps you don't have time to live at the gym. Or maybe you have competing fitness interests.
Well, I'm right there with you. I, for one, don't spend my life at the gym. In fact, I've built my shoulders training at home, often while playing with my kids. Moreover, I'm not a bodybuilder. I split my training time between obstacle course racing, lifting, and triathlon. The picture above is me at Ironman Elsinore (2023). But that hasn't kept me from building bigger, stronger, and more durable shoulders. It can be done!
In this article, I'll show you how a regular guy can optimize his training, balance competing fitness interests, make consistent progress and maintain his shoulder size, strength and health for the long term.
Below are links to the different sections. And please be sure to bookmark this page, so you can come back later.

Adventure-Ready Shoulders
What exactly is our goal here? It certainly isn’t size at all costs, nor is it just about strength. For fitness generalists, I see five main goals:
Strength: We aim for strong shoulders. To achieve this we need to lift heavy often enough to get strong, but not so often that we break down. And we want to be strong across the entire range of motion in a way that prepares us for real life.
Size: Big shoulders are undeniably impressive. They give you that coveted V-taper and put you in an exclusive club. To gain size, we need to directly target the relevant musculature with enough high quality training to generate growth while avoiding overtraining and junk volume.
Mobility: Improved mobility enhances athleticism and shoulder health and requires strength across the full range of motion of the joint. You get strong and build muscle in the ranges of motion you train, so if you’re weak in a position, you won’t get stronger by avoiding it.
Durability: We aim to avoid injury and build unbreakable shoulders. To achieve this we need to provide enough connective tissue stress to generate growth; we need to build breaks (eccentric strength); and we need to be strong in all positions (mobility). All while avoiding overtraining.
Longevity: As we age, we lose size and strength, so building muscle while we're young sets the stage for the future. Peter Attia suggests we picture it this way. Imagine yourself at 95. You want to take a flight across the country. Can you lift your and your wife’s luggage into the overhead compartment? To some degree the answer will depend on how you train today.
To learn more about training for longevity check out my article, “Maximizing Lifespan: The Essential Guide to Exercise for Longevity”. LINK HERE
All right, those are our goals. Which exercises should we use?
My Top Three Shoulder Exercises
The shoulder can be divided into three muscle groups: front delts, side delts, and rear delts. In any comprehensive program, your front delts get plenty of high quality training during chest workouts, so there's no need for additional focus on them. Similarly, your rear delts receive ample training from pulling exercises.

Front Delts

Side Delts

Rear Delts
Therefore our primary goal is to target the side delts, which deliver that broad-shouldered look. We want to train them in a full range of motion. And we want to train our shoulders for real world overhead pressing.
Equipment: To train effectively at home, you'll need a set of adjustable dumbbells.
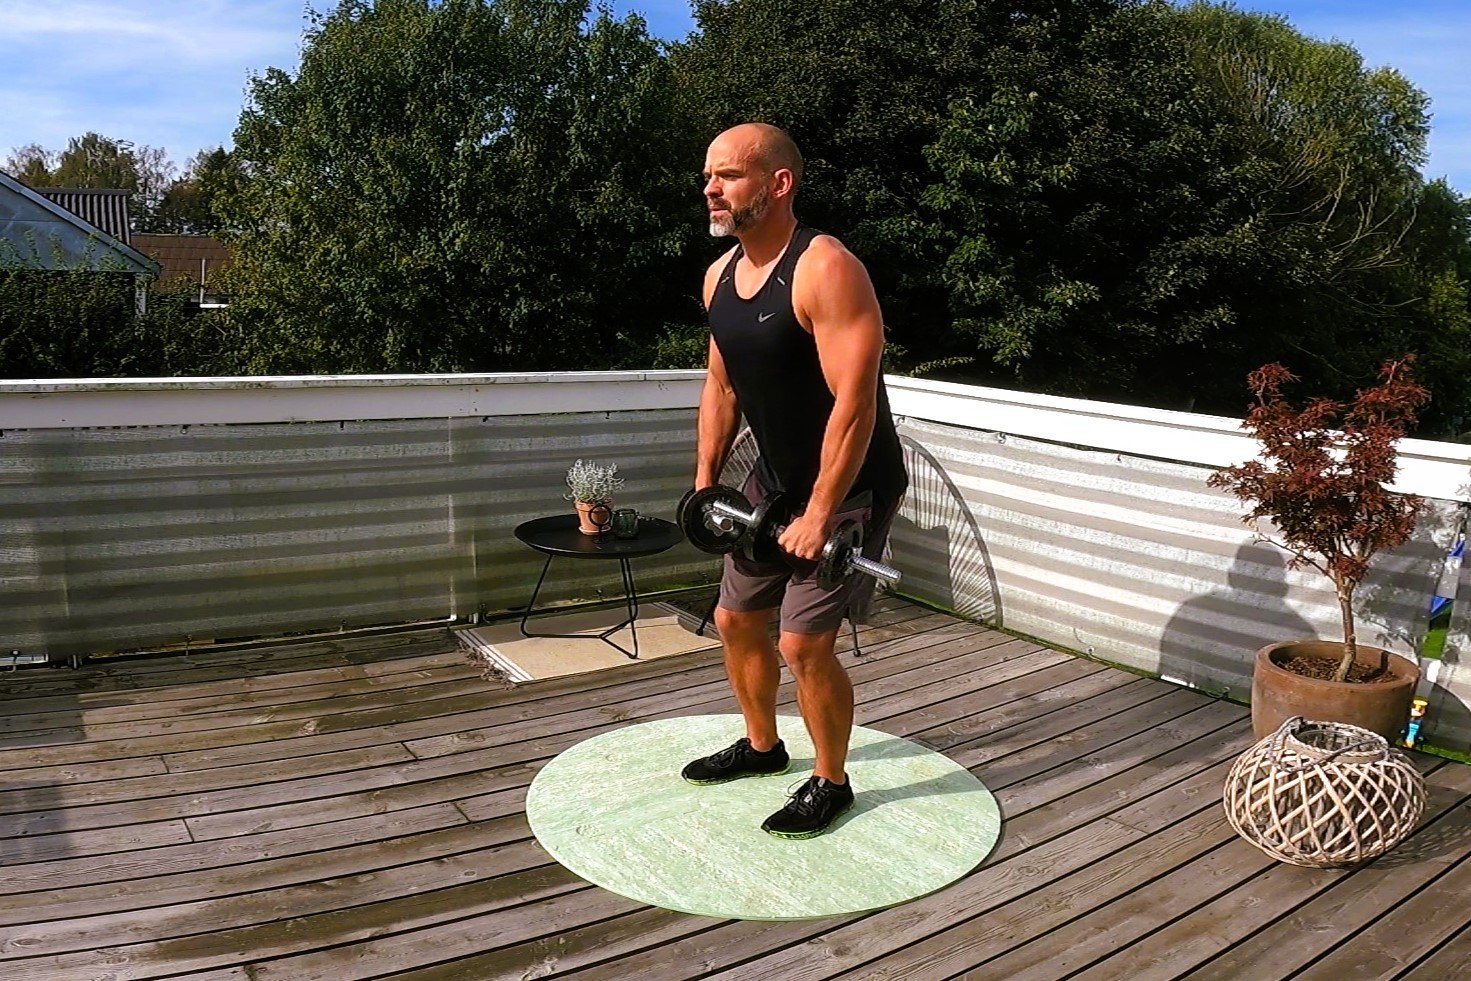
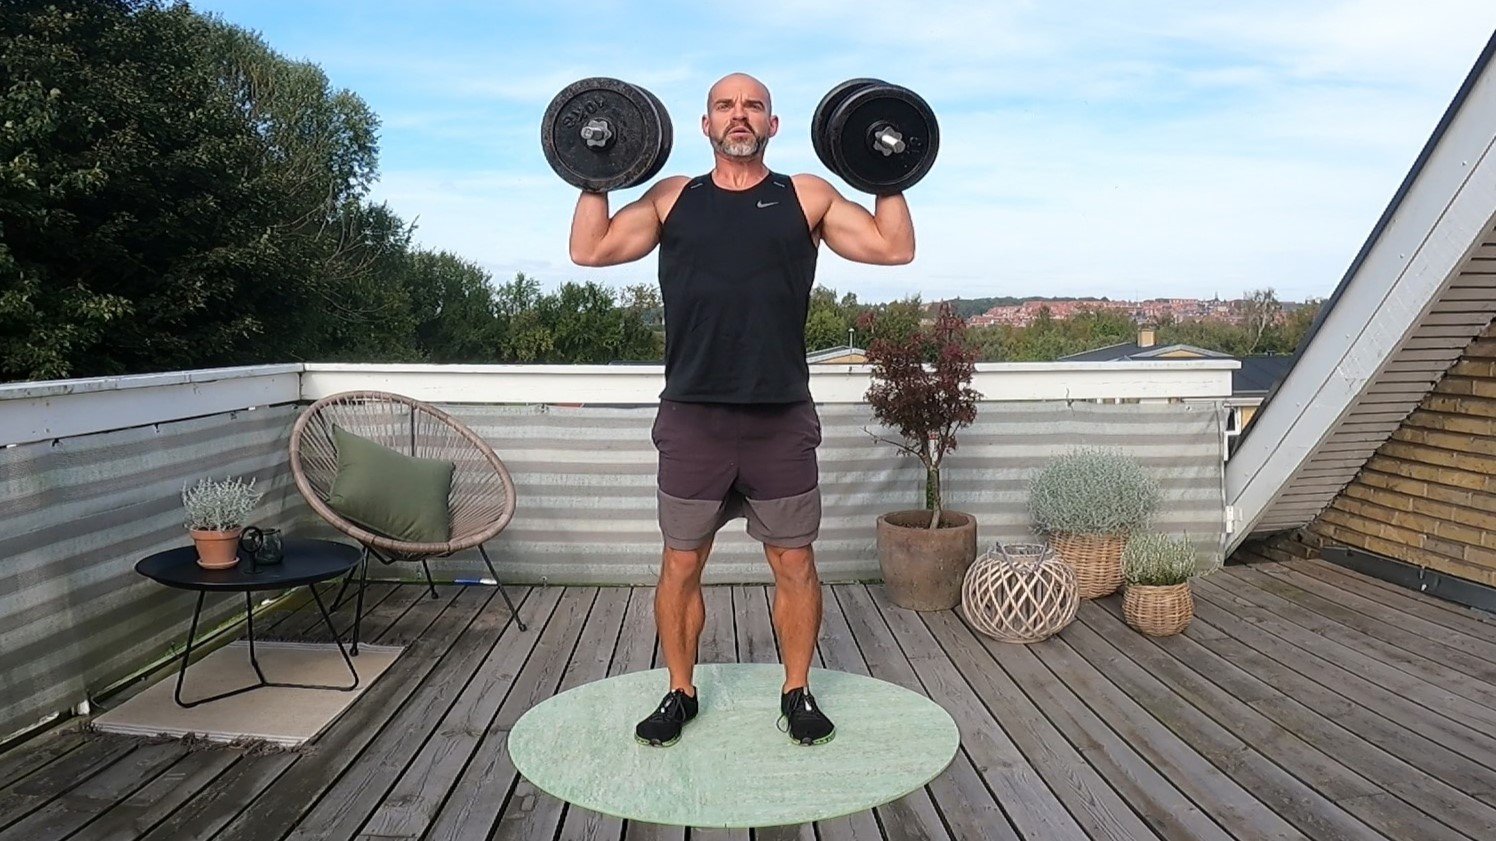
1) Standing Overhead Dumbbell Press
The Overhead Dumbbell Press is your opportunity to go heavy and build real world strength. It stimulates all three heads of your shoulders, helping you achieve a well-rounded look.
Research has shown that lifting heavy weights stimulates your tendons. So, we want to thread the needle here. Excessive heavy lifting can lead to overuse injuries, while too little heavy lifting can result in weak joints (see below for more).
Exercise Cues:
Standing is superior to sitting, as it results in greater deltoid activation than seated presses.
Each repetition should go from touching your shoulders to straight arms and back, ensuring a full range of motion.
Keep your elbows out to the side during the movement to minimize chest activation and maximize side delt activation.
There should be no leg drive or bouncing; this is an upper body exercise.
Use a slow and controlled eccentric phase (when lowering the weight) to reduce the risk of injury and maximize muscle growth.
Utilize a more explosive concentric phase (lifting the weight) to overcome any sticking points on the way up.
2) Butterfly Lateral Raises
Unless you’re a genetic freak with unbreakable shoulders and limitless energy, you can’t Overhead Press every session. You need an exercise that's less taxing on your connective tissue but directly targets your lateral delts while minimizing overall fatigue. Butterfly Raises fit the bill, offering a wide range of motion while also working your upper traps.
Exercise Cues:
Hinge forward slightly at your hips to improve the range of motion and keep your chest up to reduce the risk of shoulder impingement.
At the bottom, your palms face your body, or you can pass the weight in front of you with your thumbs facing each other (as in the video). Experiment to find what provides the most lateral delt stimulus.
Lift the weight as you would in a regular lateral delt raise, trying to keep your pinkies slightly raised to maximize lateral delt activation. Adjust if this causes shoulder discomfort.
Feel free to use a more explosive concentric phase (moving the weight up) to overcome sticking points.
Halfway through each repetition, externally rotate your arms so your thumbs point up. Start rotating just before shoulder height, and experiment with later rotation for increased muscle stimulation. Be cautious not to irritate your shoulder, and remember that this can strengthen over time.
As you rotate, stand up straight; this hip movement will help you get past the sticking point. Your shoulders are weakest when your arms are fully extended and parallel to the floor.
Use a slow and controlled eccentric phase (lowering the weights) to reduce injury risk and increase muscle hypertrophy.
3) Lateral Raises
Lateral Raises are another isolation exercise that directly targets your lateral delts while minimizing fatigue and connective tissue stress. Push yourself here, and expect significant muscle burn on the last reps.
Exercise Cues:
Hinge slightly forward at your hips and keep your chest up to enhance the range of motion while minimizing shoulder impingement risk.
At the bottom, your palms face your body, or you can pass the weight in front of you with your thumbs facing each other (as in the video). Find what maximally targets your lateral delts without discomfort.
Lift the weight, aiming to keep your pinkies slightly elevated for maximum lateral delt activation. Adjust if necessary to avoid shoulder discomfort.
Feel free to use a more explosive concentric phase (raising the weights) to overcome sticking points.
Raise the weight to around shoulder height and, as you progress, consider going above shoulder level if comfortable. Take it slow and watch for shoulder discomfort.
Pause at the top of each repetition.
Use a slow and controlled eccentric phase (lowering the weights) to minimize injury risk and maximize muscle growth.
Optimal Training Intensity for Shoulders
In most circumstances, you want to train to within 1-3 reps of failure. Failure is the point where you can't do another rep without sacrificing good form. When you're 1-3 reps away from failure, your movements typically start to slow down, and you'll feel that you don't have many reps left.
If you’re training close to failure, then the number of reps you can do will be determined by how heavy the weight is. For example, if you're overhead pressing 5 pounds, you can do it all day. But if it's 100 pounds, not so much.
As long as you're training intensely like this, rep ranges between 5-30 can effectively build muscle. Lower rep ranges are best for building strength and stimulating connective tissue, while higher reps are great for muscle building, minimizing fatigue, and reducing wear and tear on your joints.
For a deeper dive into how to train to build muscle, check out the following section of my article, “Body Recomposition: How to lose fat while building muscle”. LINK HERE
With that in mind, here are some specific recommendations.
Overhead Dumbbell Press: If everything feels good with no injuries or nagging pain, I recommend lifting heavy. This means finding a weight that you can manage to lift around 8-12 times on the first set.
Lateral Raise: For lateral raises, I recommend using either a medium or light weight, something you can lift 15 to 25 times on the first set. Take some time to experiment with it. Personally, lighter weights (around 25 reps on the first set) work well for lateral raises and induce an intense burning sensation in the side delt muscle on the final 3-5 reps.
Lateral Butterfly Raise: Here too, I recommend either a medium or light weight. Personally, medium weights (around 15 reps on the first set) are ideal for Lateral Butterfly Raises. You're on the right track when you feel an uncomfortable burn in the muscle belly of your shoulder on the final 3-5 reps.

Measuring and Maintaining Progress
Are you making progress? How do you know? The last thing you want to do is spend a bunch of time lifting weights only to discover that nothing has happened. Ultimately, there are three ways to track progress, and as you’ll see below, increased strength is by far the most important. Let’s go over each of them.
Visual Progress: Shoulders don’t just suddenly blow up. It can take months to see significant visual progress. In fact, the progress can be so slow that you might not notice it even if it’s working. So I recommend you take a picture at the start of your program. This will give you a point of reference so you can track your progress.

Measuring Shoulder Width: Start by standing relaxed in front of a wall. Then have someone mark the wall at the outside edge of each deltoid muscle. Again, don’t expect them to suddenly blow up. If you can add an inch, it’s huge. Moreover, you need to be aware that body fat plays a role here. If you are losing fat, you can expect to lose some size in your shoulders. In fact, one coveted sign of leanness is visible muscle striations in the shoulders. This can only happen if you’ve lost most of the subcutaneous fat on your shoulders.
As a point of reference, the average American male has a shoulder width of 18-¼ inches. If you can hit 19-20 inches, it will be plenty noticeable, especially if you are also very lean.
Progressive Overload: By far the single most important sign of progress is strength increases. If you are consistently getting stronger, you are almost certainly getting bigger. It isn’t a guarantee. You can get stronger without getting bigger. But if you follow something like the program below, strength gains are extremely likely to signal size gains.
If you’re just getting started, focus first on getting your form completely dialed in. Good form makes many of these exercises harder. Bouncing the weight and using short ranges of motion enable you to lift more weight. Take the ego hit. Use the right weight to maintain perfect form.

Once you have your form nailed down, focus on adding either reps or weight every week. The Overhead press, in particular, is great for this. After you add 3-6 reps, you should be able to add some weight and drop your reps back down.
For example, if you are pressing 20lb dumbbells, you might do 10 reps on week one, 12 reps on week 2, 13 reps on week 3, and 15 reps on week 4. So, you grab the 22lb dumbbells and just manage 9 reps with perfect form. Great! Now you start the process all over and start adding reps.
Breaking Through Plateaus
What do you do if progress stops? If you are not getting stronger, here are a few things to double check.
Are you training hard enough? You should be getting 1-3 reps from failure. This is the point where the weight starts moving slowly, and it starts getting really hard. Moreover, on the lateral raise and butterfly raise, you should often reach failure on the final set. You need to train hard to get results.
Is your form correct? Double and even triple-check your form. Try filming yourself so you can see how you look. Consider getting a coach.
How is your mind-muscle connection? Can you feel the exercise working the muscle? Lateral raises and butterfly lateral raises destroy my side delts. They are burning like crazy during the last 3-5 reps. It’s very uncomfortable. I don’t feel the Overhead press as directly because of the lower rep range, but I still experience extreme side delt fatigue.
Are you recovering? Are you giving yourself enough rest, good nutrition, and sleep to recover? If you aren’t progressing, it may be because you aren’t recovering. If your sleep, stress, and diet are decent, you may need to lower your training volume (See Below).
Are you training enough? If you are being inconsistent or only training 3 sets of lateral raises once a week, you probably aren’t training enough to make noticeable gains.
Constructing an Effective Shoulder Workout Program
If you train hard with good technique, then total training volume becomes the most important variable for muscle growth. Training volume refers to the total amount of work you do per muscle per week. In this instance, we are primarily focused on the side delts, and we measure volume using sets.
Generally, the most volume you can do and still recover from is going to produce the most growth. However, there are limits, especially in terms of recovery. Here are some rough guidelines to give you an idea of the relationship between training volume and growth.
Total Newbies: If you’ve never lifted weights before, then any amount of lifting is going to lead to some strength and muscle gains. But those gains will end very quickly if your volume is too low.
Beginner: If you’ve been lifting for less than a year or two (or you’ve trained longer but inconsistently on a poor program), you can likely make gains on anything between 6-15 sets per week. If you can recover, then more sets cause more growth.
Intermediates: After the first year or two (of training hard and consistently with a good program), you often need more volume to keep making progress, and the range might be more like 10-25 sets per week.
Maintenance: Typically, you can maintain with something like 4-6 sets per week. For instance, I do about 6 sets per week to maintain when I’m training for big ultra-endurance races. That way I can focus the majority of my time and energy on Ironman or Spartan Ultra training.
If you’d like to learn more about maintaining size and strength during Ironman Training, check out my article, “Can you finish an Ironman without losing muscle?” LINK HERE
Now, hopefully, you’ve noticed that I gave ranges. There are two reasons for this. First, all of this varies tremendously from individual to individual. You’ll need to experiment to see where you’re at. If you are doing too much, you won’t be able to recover. You’ll stop making progress, and you’ll start noticing nagging pains. If you do too little, you will progress very slowly or not at all.
Second, there’s a fairly large target here. The top end of the range will give you the quickest results while the bottom end of the range will give you the slowest results.
Here are two plans that you can use as templates for your own training.
A Slow & Steady Plan
For most beginners training 2x per week for a total of six sets is a solid minimum effective dose. Your gains will be very modest, but over time, they’ll add up. 6 sets are also generally enough for most guys to maintain their gains. So, if you don’t have much time, have other training priorities, or keep getting hurt with higher training volumes, here is a great program for you.

If you hit a plateau or want to accelerate your progress, try adding a set every 2-4 weeks all the way up to 10 sets per week. Training two times a week is probably a bare minimum for real gains. If you have the time, I highly recommend training at least 3x per week.
A Plan for Committed Athletes
I recommend starting with 9 sets per week and then ramping up slowly by adding one set every 1-3 weeks. If you start running into recovery issues or shoulder discomfort, back off. 15 sets per week is probably a good upper limit for the vast majority of beginners, and most beginners will do better with 9-12 sets per week. Here’s how you might program that.

Addressing Nagging Shoulder Pain
Okay, you pushed it too hard too fast and now you have a bit of shoulder pain. Maybe it’s not enough to visit the physical therapist yet, but it hurts. Now what?

Rule #1: Don’t train through joint pain!
Instead, you can try to train around the pain. Here we have a few things to try.
Double-check your form. There’s a reason coaches recommend doing exercises in specific ways. So the first thing to look at is your form.
Try using a lighter weight. For example, if it irritates your shoulder when you do heavy Overhead presses, try a lighter weight. Find a weight that you can just manage to lift 20-25 times and see if that takes the stress off of your connective tissue.
Change exercises. There are tons of great lateral delt exercises. These are my three favorites, but there are plenty of others.
Use a shorter range of motion. This is especially true of the lateral raise variations. If it hurts at the top of the movement, you’re going too high.
Cut your volume back. If all else fails, reduce your volume. Sometimes you just need time to heal.
In most cases, one of the above usually does the trick. This is especially true if you catch it early. Don’t train through pain!
Once you find a solution that works, it’s crucial to give yourself time to heal and strengthen. If you use one of the first four options, I recommend waiting months before testing the original weight, range of motion, and/or exercise. Assuming you’re still making progress, there’s no hurry to go back and reinjure yourself. If you had to cut your volume, then be sure to SLOWLY raise the volume back up after all pain and discomfort are gone. If none of the above works, it’s probably time to visit a specialist.
Thanks for reading!
This is part of a series of articles designed to help you get great results training at home. Below you’ll find links to the other articles in the series.